Can You Upload Tiff Files to Shutterfly
One of the groovy things about digital photography is that you can choose to print merely the photos you truly love—and then leave the other xx shots of your cat perched precariously on the windowsill stored safely abroad for posterity. Far too often, though, fifty-fifty our best pictures never leave the confines of our computers. But if y'all have an Internet connection and a few minutes, you can turn your neat shots into finished prints—without a photo printer, and without even leaving the business firm. Simply upload them to an online photograph-printing service and identify your gild.
There are a lot of online photo services out there, merely there tin be a huge deviation in results from one online photo finisher to the side by side. To find the best option, I took a look at nine online photo ser-vices: Kodak EasyShare Gallery, Mpix, PhotoCheap, PhotoWorks, Shutterfly, Snapfish, Wal-Mart, Webshots, and the Order Prints option built into Apple's iPhoto 5. I sent v different images to all of the services and so asked a jury of Macworld editors to evaluate the prints' image quality. I incorporated their opinions into my overall evaluation of the services.
While I was hoping to notice a clear winner that ever produced superior prints, the frustrating truth is that virtually services produced good prints at some times and bad prints at other times. Yet, in one case you lot weigh toll, speed, ease-of-uploading, and a few other considerations, some services stood out from the pack—in particular, Snapfish.
Submitting Your Images
All the services I tested have JPEG files, the standard format for digital cameras. Mpix, PhotoWorks, Wal-Mart, and Webshots besides have TIFF files. However, since TIFF files are substantially larger than JPEGs, they take much longer to upload. Unless you lot're printing a large image and are extremely picky almost image quality, I recommend sticking with JPEG. If you're shooting in your camera'south Raw format, yous'll need to convert the images before uploading them to any photo service. iPhoto 5 does this automatically during the upload procedure.
Uploading With the exception of iPhoto 5, which handles uploading for you, all the sites I tested let you lot upload images via a Web interface. However, I don't actually recommend doing then unless yous take but a few images or are looking for a tedious mode to laissez passer the time. Having to locate each file one by one is cumbersome. What's worse, you can upload only minor batches of images at a time—which can brand for a very time-consuming process. But while none of the Web interfaces were a pleasance to utilize, PhotoCheap'southward clunky, and at times confusing, Spider web site was the worst of the lot.
To make uploading easier, Kodak, Mpix, PhotoWorks, Shutterfly, and Snapfish offer either stand-alone applications or browser plug-ins. Kodak, PhotoWorks, and Snapfish take the atomic number 82 here; their well-designed upload tools let you simply elevate and drib files from the Finder (see "Painless Uploads").
 |
| |
Sharing One corking reward a Web-based photo service has over your local photograph developer is that it lets you share your prints with others. All these services let you create online albums, fill them with images, and so ship announcements to friends and relatives. Guests can look at your images and even lodge prints of their own—saving you lot the hassle and expense of creating and mailing duplicate pictures to multiple people. Almost sites volition go out your photos up indefinitely equally long equally you lot order prints at to the lowest degree once a year.
All but i of the services I looked at offering very good sharing services: PhotoCheap forces yous to upload your images a 2nd time, to a divide expanse designated for sharing. iPhoto's built-in sharing option requires membership in Apple's $99 .Mac service, and information technology doesn't allow visitors to order prints. However, some iPhoto plug-ins will let you lot upload your images to a dedicated photo-sharing service; for case, Fraser Speirs'southward free FlickrExport uploads photos to Flickr.com.
Preparing Your Society
Just as your local photo lab provides a variety of printing options—from glossy paper to cocked borders—many online photo services let you customize your order; some offer an phenomenal array of options.
Print Sizes and Finishes All the sites I tested offer the basic print sizes—including 4 by 6 inches, 5 past 7 inches, and 8 by x inches. Mpix offers the greatest variety of sizes, with xx choices ranging from wallet size to xx past 30 inches. PhotoWorks offers the largest size: 24 by 36 inches.
Yet, depending on the size of your files, not all of these options will be practical for your images. If yous try printing a two-megapixel image at viii by 10 inches, for instance, you lot're going to be sorely disappointed with the results; the image volition likely suffer from blocky details and fuzzy compression artifacts. All these services provide guidelines that explain how many pixels you'll need for specific print sizes (come across "Counting Your Pixels" ). And all just Mpix and PhotoCheap volition warn you if you don't accept plenty pixels for the chore.
In addition to standard glossy prints, Mpix, PhotoCheap, PhotoWorks, Shutterfly, and Snapfish offering a matte option. PhotoWorks and Shutterfly also offer a Sheet pick. The texture of matte papers can vary—some are more pebbled than others. One editor on our panel of jurors, for instance, disliked the matte end from Mpix; he thought it made the image await blurred. I recommend ordering a small sample before committing to a large matte society.
Cropping to Fit Traditional photo sizes, such as four-past-vi-inch and 5-by-7-inch prints, were created to adapt the 3:2 aspect ratio of 35mm film. However, most digital cameras apply a iv:iii aspect ratio—the same every bit a Tv set screen. (Digital SLRs, such equally the Canon Digital Rebel, are an exception here. They usually shoot at 3:two.) Considering of this discrepancy, most digital images won't fit traditional print sizes without cropping. If you lot forget, some of the services volition crop for you—though not with any real thought given to the composition of the epitome. Others will go out white borders along the sides of your image.
Of the sites we tested, Mpix, PhotoWorks, Shutterfly, and Wal-Mart provide the most flexibility when it comes to cropping or zooming. All offer piece of cake-to-apply controls that can be applied either to an unabridged batch of photos or on an individual basis. Kodak besides provides skilful cropping controls that allow you lot crop each paradigm separately—to either predefined or custom sizes—just information technology doesn't work in Safari. Y'all'll need Microsoft Internet Explorer or Mozilla's Firefox.
PhotoCheap doesn't offer Mac-compatible cropping features. Instead, it gives you the selection of press at a 4:iii aspect ratio, such as 4 by five.3 inches. PhotoWorks also offers special 4:3 sizes, including 3.75-by-v-inch and 4.5-by-6-inch prints. These options salvage you the problem of cropping. However, the prints won't fit a standard picture frame. That's not as much of a problem equally it used to be, thanks to online frame vendors, such as Framesbymail.com, which provide 4:three frames.
 |
| |
At the lesser of this pile are Snapfish and Webshots—neither of which provides zooming or cropping controls. Surprisingly, iPhoto also offers weak support in this area. Different the other online services, iPhoto gives no warning if your images don't fit your chosen impress size. And once yous're in the ordering procedure, there are no zooming or trimming options. You must have your images properly cropped and adjusted before you lot click on the Club button.
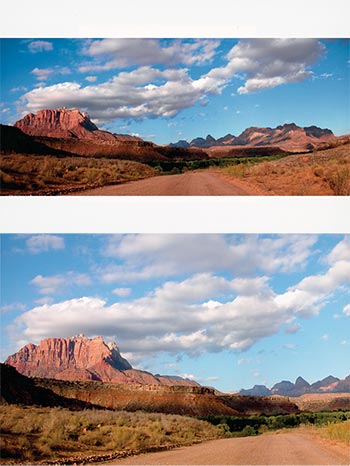
If you have whatever panoramic images, or if y'all've cropped your pictures to a different attribute ratio—say, to fit a square frame—you'll desire to accept the service letterbox your photo so the unabridged scene fits on the page, rather than cropping (see "Going Wide"). Of the services I tested, only Mpix didn't offer such a feature.
The Waiting Game
Delivery times differ greatly from service to service. And because of your geographic location, you may detect that your delivery times differ from ours. When I had prints shipped to my function in San Francisco, I got the fastest results from Kodak and iPhoto (not surprising, since Apple uses Kodak for iPhoto prints), which delivered the prints to my door the next day. Most services delivered within two or iii days. The slowest responses were from Webshots and PhotoCheap; their photos took six and eight days, respectively. In all cases, the prints were sturdily packaged and arrived intact.
If speed is of the essence and y'all live almost one of Wal-Mart's more than than 3,600 outlets, Wal-Mart may be your best option. The company lets you upload your photos from your figurer, prepare your society, and select a store, and within an hour your prints will be prepare for pickup at your chosen location. You lot'll also avoid the aircraft charge.
Image Quality
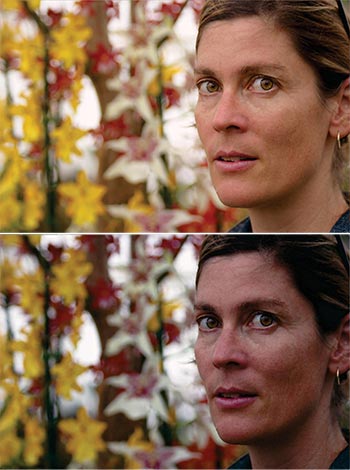
Of course, the true test of any photo service is the quality of its prints. I submitted a variety of images to each service, including a bright landscape shot, a couple of indoor portraits, a depression-lite examination, and a black-and-white paradigm (run into "Proof in the Print"). Although no single service gave me the best version of every print, I did find some clear winners and losers.
 |
| |
Overall, Snapfish sent the best images. Its prints all had good exposure, dissimilarity, and particular. The saturation was nice, also. Mpix, which also handled exposure and brightness very well, was a shut second. Despite being the slowest service and offering the fewest features, PhotoCheap's prints were expert overall but slightly depression on contrast and saturation.
As Macworld has seen in past reviews of photograph services ("Plough Pixels into Prints," June 2002, and "Hot Shots," October 2003), there was a slight difference in quality between prints ordered from iPhoto and prints ordered directly from the Kodak site, despite ostensibly coming from the same place. Kodak's impress was slightly improve than iPhoto's, but the differences were subtle, and both delivered good results overall—though not as strong as results from Snapfish or Mpix.
The worst of the bunch was Webshots. Its photos were consistently dark, low on contrast, and just obviously dingy. Although not every bit bad as Webshots, both PhotoWorks and Wal-Mart also yielded images that were a little likewise night.
The almost difficult service to judge was Shutterfly. It provided an nearly even balance of acceptable and unacceptable prints. Although no service provided perfect prints for all of my samples, Shutterfly was more varied in quality than whatsoever of the others. Before relying on whatever of these services for a huge order, I recommend trying out a few shots and judging the quality for yourself.
Macworld's Buying Advice
For getting the best print quality possible, Snapfish and Mpix are my services of pick. While Mpix offers an astonishing array of sizes, Snapfish'due south excellent image quality and Mac-friendly interface make information technology the accommodating standout.
If ease of use is your top priority and y'all already own Apple'southward iLife suite, iPhoto is your all-time bet. Although the pictures weren't the jury's favorites, they will satisfy almost customers, and the time you save on uploading images to the Web may recoup. If you absolutely must have your prints right away, Wal-Mart's walk-in service may be appealing. Nevertheless, you lot'll go comparable quality by only walking into a nearby photo center. If you go either of these routes, I recommend brightening your images before submitting them.
[ Based in San Francisco, Ben Long is the author of Complete Digital Photography , third edition (Charles River Books, 2004). ]
I-hour service
If you tin't wait a couple of days for your prints and you don't have a printer at dwelling, wait for a drugstore or a i-hour photo lab such as Wolf Camera. Many of these establishments accept photo kiosks that can read all major media, including CD-ROMs. Subsequently you insert your memory carte du jour or disc, you'll be led through options very similar to what you'd see on a photo-printing Web site. When you submit your order, it's delivered to the in-business firm photograph lab, which develops your prints just as if you'd dropped off a roll of film. Turnaround times can vary, depending on how busy the store is, but you can unremarkably come up back for your prints inside an 60 minutes or two. I sent my test images to Wolf for processing. Although the results weren't as practiced equally what I got from some of the better online services, they weren't bad. If yous're in a bustle to get your prints, or if you don't take a fast Cyberspace connection for uploading, then kiosk printing is a speedy, affordable alternative.
Counting your pixels
Although different services may have different specifications, here are some general guidelines for how many pixels you'll need to print at standard prototype sizes.
Keep in mind that if you've changed the Quality setting on your photographic camera, it may not be using its full pixel capac-ity when snapping shots. So while your camera may exist able to capture three-megapixel images, if you lot've set the Quality to Medium to relieve infinite, your images may be considerably smaller. If you're using iPhoto, you tin can bank check your image's pixel dimensions by selecting it in the library and pressing Command-I. In Adobe Photoshop or Photoshop Elements, become to Image: Image Size and Paradigm: Resize: Image Size, respectively.
| Print Size | Minimum Resolution |
|---|---|
| iv x 6 inches | 1,280 10 960 pixels (roughly 1 megapixel) |
| v 10 7 inches | 1,600 ten 1,200 pixels (roughly 2 megapixels) |
| eight 10 10 inches | 1,600 x 1,400 pixels (roughly iii megapixels) |
Print at home or order in?
Online printing services will deliver your favorite photos right to your door within a few days. Simply they're not your only pick for putting those pixels on paper. Thanks to the prevalence of modest, affordable desktop printers, it'southward easier than e'er to impress your own photos at home. Many of these printers will fifty-fifty impress stacks of borderless 4-past-half-dozen-inch prints simply like the ones you'd get from a service. So which route is right for you lot?
Photo-Printing Services
How It Works Photo-printing services use a combination of digital and traditional flick press technologies to create your prints. The digital data that you submit is used to expose a slice of photographic paper. That newspaper is then processed and adult just as if information technology had been exposed through a piece of photographic film.
The Good The advantage of a photo service over a desktop printer is that the prints you get back will accept a truly continuous tone, which means that y'all'll never meet individual pixels or printer dots (though with low-resolution prints, you might see other annoying artifacts). In add-on, the prints you get back from a photo-printing service tend to exist far more resistant to fading and colour shifts than what you'd get out of a home printer—although that'southward becoming less of an consequence, thank you to today'due south long-lasting inks and papers.
Then there's convenience. With a photo-printing service, you upload your images and so get dorsum to your life while you expect for your prints to get in in the mail service. Yous don't have to worry about choosing papers, trimming borders, or immigration paper jams.
The Bad If you don't like the results you get from a detail service, you can't tweak the prototype and reprint information technology without a lot of hassle and more waiting. And for larger print sizes, doing your own prints is normally a niggling more cost-effective, specially when y'all add in the cost of shipping and handling.
Photograph Printers
How It Works Ink-jet printers spray tiny droplets of ink onto a page. By combining several (between four and seven) different colors of ink, they create the illusion of a continuous-tone print.
The Good If yous need prints in a hurry, or if you want to tweak your prints to perfection, and so you'll exist better served by press yourself. If you discover that you don't similar the color or that the image seems soft, you tin make adjustments and print the image once again. For low-fuss printing, consider getting a printer that prints but four-by-6-inch prints, such as the $250 Epson PictureMate Deluxe Viewer Edition or the $200 Hewlett-Packard Photosmart 375 Meaty Photo Printer. These meaty printers can print from your Mac or directly from a media card. However, getting good results may take several exam prints. This will mean using more ink—the most expensive part of the printing process. Still, the per-print costs for these printers come to around $0.29 per page, which makes them competitive with photograph-printing services. And you won't have to pay shipping fees.
The Bad Making your ain prints is more work than ordering from a service, especially if you lot're hand-correcting your images. Of grade, that labor pays off in better paradigm quality, simply if you lot need to quickly creepo out dozens of snapshots, doing your ain printing may not be a reasonable solution.
In the end, y'all can think of these printers as a home darkroom. When image quality is paramount, it may exist better to do it yourself. When you demand many images with fiddling effort, you should probably get with a photo service.
The Epson PictureMate Palatial Viewer Edition can print 4-by-6-inch prints from just most anywhere, thanks to an optional battery pack.
Fine-tune prints for iPhoto books
While I might not put the photos ordered through iPhoto v at the top of my list, the program'due south photograph books are a different story. With the release of iPhoto v, Apple unveiled new volume-printing features that offer more than options and higher quality than the previous service. At present, in addition to the original hardcover volume with single-sided pages, you can choose between several sizes of paperback books, all with either single- or double-sided pages. The new sizes non only toll less (equally low as $15, including shipping, for three tiny softcover books) but besides offer more than pattern choices, and then y'all tin can craft books that are appropriate to more situations.
Though setting up a volume is easy, it'due south not without pitfalls. Hither are some tips for getting the all-time-looking images from your books while avoiding some of the program's quirks.
Before Yous Enter Volume Way
If you want your iPhoto books to look fantastic, requite the images you include a bit of special attending:
Lighten Dark Shadows iPhoto books suffer from dot gain , a darkening of images that'southward caused by the paper absorbing as well much ink. And so it'due south a skillful idea to err on the side of lighter images. If you lot take a very night prototype, apply iPhoto 5'southward Adjust controls to brighten information technology up. Patently, you don't desire a done-out image, but if your picture has lots of night, shadowy particular, a little adjustment can help ensure that you don't lose it.
Add Contrast The human eye loves dissimilarity. A photo with stiff distinctions betwixt light and dark tones will be more pleasing and yield slightly punchier color. Adjusting contrast is very easy in iPhoto five. Consult the histogram in the new Suit palette, and set the white and black points so they sit right at the edge of the graph. ( Click here for a tutorial on reading and using the histogram.)
Sharpen The printing process used for iPhoto book printing doesn't yield tremendously fine detail. Individual hairs and delicate textures can sometimes go lost. So it's a good thought to apply some slightly aggressive sharpening to your book's images. This will requite y'all better item, and it volition help to improve the contrast in your terminal image. Also much sharpness can be a bad matter, though. Don't push the sharpening to the point where you see noticeable halos effectually the fine details in your paradigm.
Rotate You can't rotate images in the book-layout manner, so you need to exist sure that all your images are properly rotated before yous begin laying out your book.
Convert Books don't back up Raw files, and then create JPEG versions of whatsoever raw images yous want to include, before you kickoff laying out your book.
Perfecting Your Book
Creating a book in iPhoto is uncomplicated. Select the images you want to include—either in the main library or in an anthology—then click on the Volume button. A simple dialog box will let you lot pick the blazon of volume and an overall theme.
Mix and Friction match Each theme has a unique overall design and a number of dissimilar lay-out schemes that fit into that pattern. While this helps ensure that in that location's a little something for everyone, it besides means that you'll need to do a fair amount of experimentation to notice the layout that works best for your project. For example, some page designs crop your photos. You can scale and pan within the cropped area, but if you lot want to display an image with an unusual aspect ratio, you lot might demand to change that folio type, or even option a different theme. Some folio designs also include a field for text, which can affect your folio-design choice. Y'all tin easily drag and drop new layouts onto a page to change the way each page looks.
Rearrange You tin drag images simply between facing pages. To move an paradigm from one 2-page spread to some other, drag it off of the current page; this makes it bachelor for use, and y'all can then identify information technology on a new page.
Double-Cheque Your Piece of work iPhoto'southward thumbnail display is non ever up-to-date. One time you lot've completed your layout, look at each page and be certain it's correct. Don't rely on proofing via the thumbnail images.
Force Save Laying out a book can accept a while, and iPhoto doesn't have a Salve command. It's a expert idea to quit and restart iPhoto every and then oft, to force the program to save your book pattern.
iPhoto's improved book-pattern interface makes it easy to select layouts for book pages,and to quickly move images from page to page.
Source: https://www.macworld.com/article/176199/photoprints.html
0 Response to "Can You Upload Tiff Files to Shutterfly"
Postar um comentário